

Discord
Configure Discord triggers to receive notifications in a channel whenever users submit feedback
Overview
The Discord destination lets you send notifications to a Discord channel every time someone submits feedback through your forms. Whether you want your team to stay in the loop on customer sentiment, catch bug reports as they come in, or simply never miss a response—Discord triggers ensure feedback lands in your server the moment it arrives.
This guide walks you through the full setup, from creating your first Discord destination to configuring the webhook and optional display settings. We'll keep things straightforward and explain each step along the way so you can get up and running without any guesswork.
What You'll Need
Before you start, make sure you have:
- A feedback configuration — The form or feedback stream you want to send to Discord
- A Discord server — Where you want notifications to appear
- Manage Webhooks permission — On the target server (or ask a server admin to create the webhook for you)
- A Discord webhook URL — Created from your server's integration settings (format:
https://discord.com/api/webhooks/...)
If you're not sure how to create a webhook, open your Discord server → Server Settings → Integrations → Webhooks → New Webhook. Choose the channel, copy the webhook URL, and keep it secure—treat it like a password.
Step 1: Open the Destinations Page
Head to the Destinations section in your encatch dashboard. This is where you manage all your integration endpoints—Slack, Email, Jira, GitLab, GitHub, Discord, Webhooks, and more.
On the Destinations page, you'll see a table showing any destinations you've already set up (or an empty table if you're starting fresh). In the top-right corner, look for the Add Destination button—that's your starting point.
Click Add Destination to open the configuration flow.
Step 2: Add a New Destination
A modal will appear for your new realtime destination. You'll notice fields for naming and describing what this destination is for.
Feedback
Choose the published feedback form this destination will listen to from the Feedback dropdown.
Destination name and description
Give your destination a clear name—something like "Discord product feedback" or "Notify #support on new responses". Optionally add a Description so your team can tell what this integration does at a glance.
Select a connector
Scroll to the Connector section. Available connectors for realtime destinations are listed with their type, name, and description. Find Discord Notification:
- TYPE: Discord (with the Discord icon)
- NAME: Discord Notification
- DESCRIPTION: Send Notifications to Discord
- VERSION: v1
Click the connector row to select it. When selected, the row is highlighted and shows a checkmark.
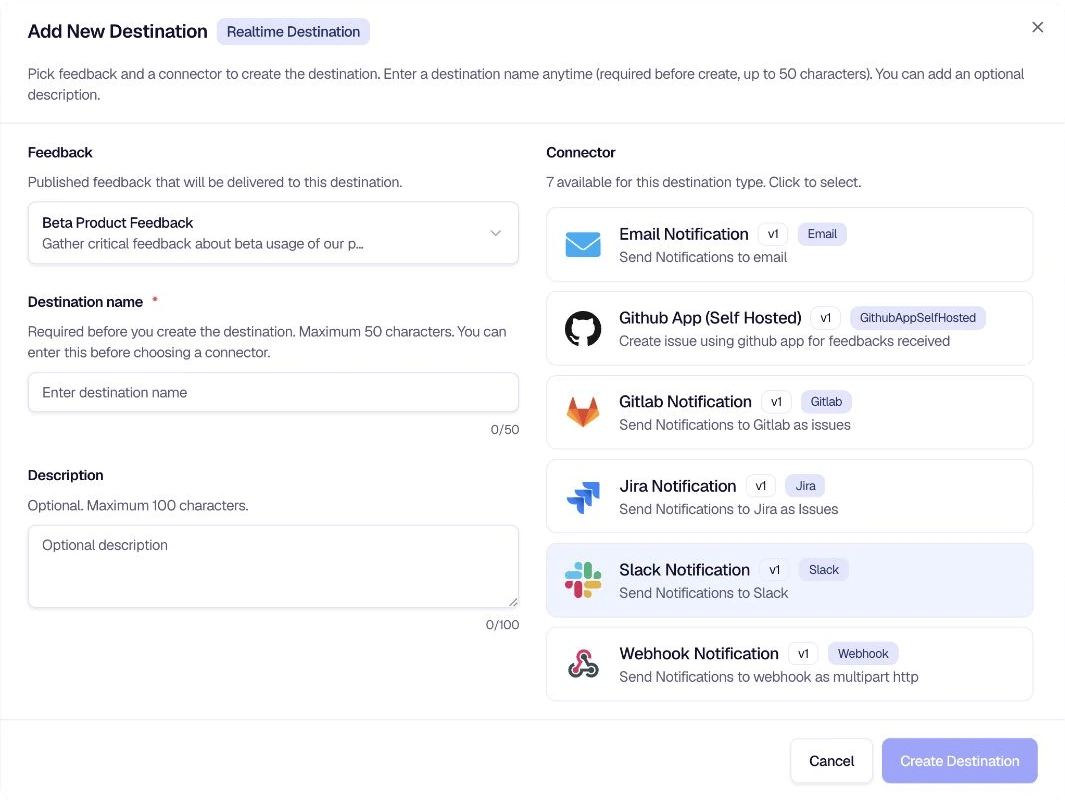
Then click Create Destination at the bottom of the modal to proceed.
Step 3: Configure Your Discord Destination
After creating the destination, you'll land on the Edit Destination page. This is where you set up all the details that control how and where your Discord notifications are sent.
Destination Details (Left Column)
On the left, you'll see cards for:
- Destination Details — Confirm the type (e.g., Realtime) and any high-level settings
- Feedback Configuration — The feedback form you linked in the previous step
- Connector Configuration — Shows Discord Notification and its description
- Destination Name — Edit the name you gave earlier if needed
- Destination Description — Edit the description if needed
Click Save Details when you're done with these fields.
Discord Configuration (Right Column)
The right side contains the Discord webhook setting encatch uses to post to your channel.
Webhook URL
Enter your Discord webhook URL. This is required. encatch uses it to post messages to the channel you configured in Discord. The URL typically looks like:
https://discord.com/api/webhooks/123456789012345678/abcdefghijklmnopqrstuvwxyz
Copy the full URL from Discord's webhook settings. The value is masked for security once saved.
Click Save Configuration when you're done.
Step 4: Configure Filters (Optional)
Use Custom Filter for exact field-based rules, or AI Filter for meaning-based routing. Matching events continue to Discord; non-matching events are not sent.
Click Test and Enable Custom Filter to build and validate a deterministic rule. If a Custom Filter is already active, the card provides Edit & Test and Disable Custom Filter controls.
If you want to filter which feedback triggers a Discord notification, you can enable the AI Filter.
The AI Filter uses natural language prompts to decide which feedback should be forwarded to Discord. For example, you might only want to notify your team for negative feedback, or for feedback that mentions specific keywords like "bug" or "crash."
To enable it:
- In the AI Filter section, click Test and Enable AI Filter
- Configure your prompt to define the criteria
- Test the filter with sample feedback to ensure it behaves as expected
If you prefer to receive every notification without filtering, you can leave the AI Filter disabled.
AI Filters use AI Credits. Each execution consumes 1 AI Credit. See the AI Filters guide for more details.
Step 5: Test and Enable
Before going live, test your setup. On the Destination Status card, click Test & Enable Destination to verify your webhook URL works and that encatch can successfully post a test message to your Discord channel. Once the test passes, the destination will be enabled and will start sending real notifications for every new feedback response that matches your configuration (and any AI filter you've set up).
Summary
Here's a quick recap of the flow:
Go to Destinations — Click Add Destination on the Destinations page.
Select Discord connector — Choose your feedback configuration, name the destination, then select Discord Notification and click Create Destination.
Configure Discord webhook — Enter the Discord Webhook URL and save the configuration.
Optional: Add a filter — Use a Custom Filter for exact rules or an AI Filter for meaning-based routing.
Test and enable — Click Test & Enable Destination to validate the webhook and activate delivery.
Tips and Best Practices
- Use a dedicated channel — Create a channel such as
#feedback-alertsor#customer-supportso notifications stay easy to find. - Restrict webhook access — Anyone with the webhook URL can post to that channel. Do not share it publicly; rotate the webhook in Discord if it is exposed.
- Test before enabling — Always run a test to confirm the webhook URL is valid and messages appear in the right channel.
- Choose the right filter — Use a Custom Filter for exact conditions and an AI Filter when the meaning of the response matters.
Troubleshooting
Was this page helpful?