

Appearance
Customize the look and feel of your feedback form
The Appearance tab lets you control how your feedback form looks and behaves. On desktop, the editor has a left configuration column, a center preview, and a right editor when you open Theme or a section layout. Appearance sits under Form design, alongside Questions and Logic jumps.
Overview
Use Appearance to align the form with your brand: colors, typography (font family), custom CSS, and form behavior for in-app and shareable experiences. Theme opens a right-side editor with Basic and Advanced tabs. The center preview shows the form in device frames, and Section Layouts lets you set defaults or override individual sections.
Appearance tab layout
-
Left column — Configure
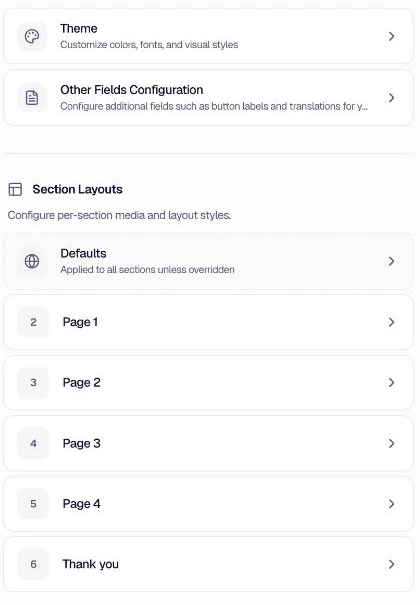
- Theme (palette icon): opens the right-side Theme editor.
- Other Fields Configuration: opens shared display and button-label settings.
- Section Layouts: includes Defaults, which applies to all sections unless overridden, followed by each page and the Thank you section for per-section media and layout.
-
Center — Preview Live preview with device tabs, light/dark preview, language, and toolbar actions including Your screenshots (device mockup uploads).
-
Right — Theme or layout editor (when active) Theme opens the Basic or Advanced theme controls. Picking a section or Defaults under Section Layouts opens the layout and media controls for that scope.
Theme editor
Open Theme from the Appearance configuration column. The right-side editor has two tabs:
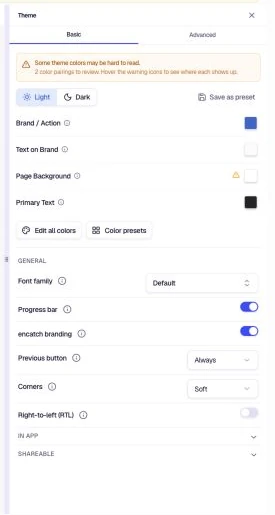
- Basic — Light and Dark color settings, Edit all colors, Color presets, Font family, and form controls such as Progress bar, encatch branding, Previous button, Corners, and Right-to-left (RTL).
- Advanced — The Custom CSS editor.
Basic colors
Use the Light and Dark controls to configure the two modes. The visible core color fields are Brand / Action, Text on Brand, Page Background, and Primary Text. If the selected color pairings may be hard to read, the editor displays a review warning; use the information icons to check where each color is used.
- Choosing a color: Click the swatch and hex preview (monospace). A color picker opens in a popover; when you close the popover, the value is applied.
- Copy: The copy control copies the hex value and shows brief confirmation.
- Hints: The information icon next to each label opens a tooltip with usage notes.
Brand / Action
The main accent color used for primary actions. Choose a color that remains distinct from the page background in each mode.
Text on Brand
The color of text or icons placed on the Brand / Action color.
Page Background
The page background color for the form.
Primary Text
The primary text color for questions, labels, and body text.
Edit all colors
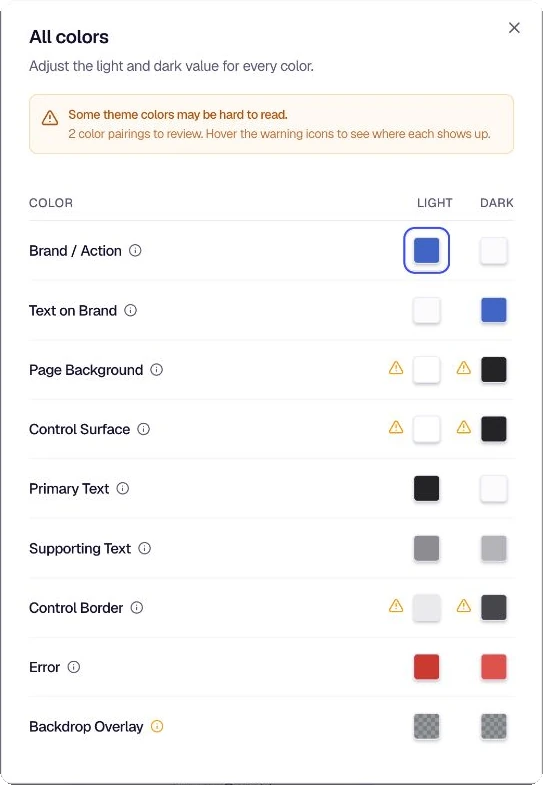
Use Edit all colors in the Basic tab to open the complete color controls. Use Color presets when you want to start from a predefined palette.
The complete dialog includes:
- Brand / Action and Text on Brand for primary actions and their foreground content
- Page Background for the form page
- Control Surface for inputs and other interactive surfaces
- Primary Text and Supporting Text for the content hierarchy
- Control Border for inputs, cards, and dividers
- Error for validation and error states
- Backdrop Overlay for the layer behind a modal or popup
Custom CSS (Advanced tab)
Open the Advanced tab to use the Custom CSS editor. The editor exposes the form's customization hooks and includes controls for common editing actions and downloading the CSS.
Font family (Basic tab)
Font family is in the Basic tab of the Theme editor. It sets the form typeface from encatch-hosted web fonts (central font manifest).
- Default: Built-in system or default stack (shown as the system default in the picker).
- Other fonts: Each row is a manifest key, with metadata (weight/style for preview) and a live preview of the font name when the font loads.
- Search and scroll: Use Search fonts..., scroll the list, and choose a row to apply (popover closes). Long lists load more as you scroll toward the bottom.
- Saved value: The manifest key for the selected font (not a raw CSS
font-familystring). Keys removed from the catalog can still appear so your choice is preserved. - Errors: If the list fails to load, a short message may appear; the saved value remains.
Use the information icon next to Font family for the in-product note about hosted fonts and manifest keys.
Basic form settings
Scroll the Basic tab below the color controls to configure visible options including Progress bar, encatch branding, Previous button, Corners, and Right-to-left (RTL). Additional in-app and shareable settings appear farther down the same editor.
Corners
Use Corners to choose the form's corner treatment. The selected treatment is reflected in the center preview.
Dark overlay
When enabled, a semi-transparent dark overlay appears behind the form while it is open. When disabled, the background stays visible. On native mobile apps, disabling this uses a blocker-style popup with a transparent overlay instead of a dimmed one.
Close button
When enabled, users can dismiss the widget with a close control before finishing the form. When disabled, they typically need to move through or complete the form to exit.
Progress bar
When enabled, a progress indicator shows how much of the form remains.
encatch branding
Controls whether Powered by encatch appears. A lock icon can indicate plan or permission limits.
Previous button
Select Always or Never to control whether a previous-step control is shown in the form flow.
Right-to-left (RTL)
When enabled, RTL layout applies for supported form languages (for example Arabic, Hebrew, Persian, Urdu). See the in-product help for the exact language list.
In-app display
Expand In App in the Basic tab to configure how the form appears inside your product:
- Dark overlay dims the host interface while the form is open.
- Close button lets respondents dismiss the form before completion.
- Size controls the in-app form size.
- Position places the form on a corner, edge, center, or full-center surface. Default (bottom right) uses the standard placement.
- Display type controls how the in-app form is presented. Auto lets encatch choose the appropriate presentation.
- Max dialog height limits the form height as a percentage of the viewport. The default is 75%.
Shareable display
Expand Shareable in the Basic tab to configure forms opened through a shareable link:
- Size controls the shareable form size.
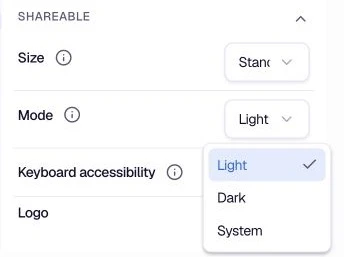
- Mode can be Light, Dark, or System. Light and Dark fix the theme, while System follows the visitor's browser or operating-system preference.
- Keyboard accessibility enables desktop keyboard shortcuts for fullscreen shareable forms.
- Logo controls whether the configured logo appears on the shareable form.
Keyboard accessibility (shareable)
When enabled on desktop shareable links, respondents can use keyboard shortcuts:
- Enter — next question, submit, or activate the thank-you Done button
- Backspace — previous question or section (also works from empty text fields)
- Tab — moves focus within the survey (focus stays inside the form)
- Number keys — select ratings, choices, CSAT scores, and similar options (press the same key again to clear where supported)
- Space — toggle consent, matrix cells, and file-upload browse zones
Only applies to fullscreen shareable forms on non-touch-primary devices.
Widget position options
Open In App → Position in the Theme editor to place the form. The dropdown lists the placements below.
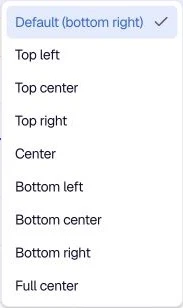
| Position (label) | Description |
|---|---|
| Top Left | Upper-left corner |
| Top Center | Top edge, centered |
| Top Right | Upper-right corner |
| Center | Center of the screen (horizontal and vertical) |
| Bottom Left | Lower-left corner |
| Bottom Center | Bottom edge, centered |
| Bottom Right | Lower-right corner |
| Full Center | Centered presentation that uses the full available dialog area |
Default placement when not customizing is bottom right.
Preview panel and device mockups
The center preview toolbar includes light/dark toggles, device framing, language, and Your screenshots (upload icon) to open Upload Device Mockup Images.
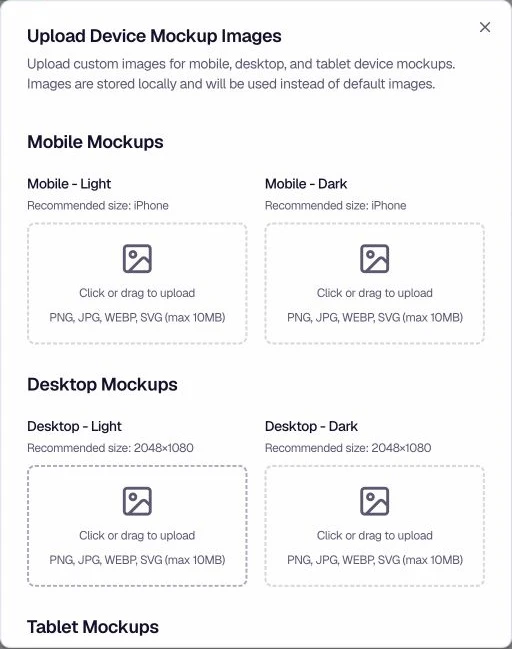
Upload custom images for mobile, desktop, and tablet, each with light and dark variants. The dialog accepts PNG, JPG, WEBP, and SVG files up to 10 MB. It recommends iPhone dimensions for mobile, 2048×1080 for desktop, and iPad Air dimensions for tablet. Images are stored locally for the project and replace the default mockup artwork in preview flows.
Was this page helpful?